Since a
box camera is essentially a daylight use camera it will be helpful if the
photographer has some idea of how daylight can affect the process of making a
picture.
The light
falling on a subject out in the open comes from three sources—direct sunshine,
light coming from the sky overhead, and that reflected off buildings and other
nearby objects. When confronted with a brilliant sunlit scene, it is easy
to overlook the role played by reflected light. The observer, if he is careful
enough, will notice that the scene is interspersed with areas of shadow, large
as well as small, and light reflected off the surroundings and sky helps to
light up these areas, keeping them from appearing as dark, featureless blobs.
Again, on
cloudy and overcast days, you can hope to take pictures out of doors only with
the aid of reflected light, although the general level of illumination at such
times is several times less than what you would find on a bright sunny day.
Thus, if
we shoot out of doors on a cloudy day, and use the same camera settings as we
did on a sunlit day, we can be sure that far less light will reach the film,
and this in turn will mean that after the film is processed, our negative is
going to appear thin, lacking in adequate darkness and detail.
The
general rule then, is, the less the light that reaches the film, the thinner
and paler will be our negative. And conversely more light during exposure
produces a darker result. Both extremes are undesirable, and the art of
photography lies in knowing just what camera settings to use that will give a
well balanced, correctly exposed result. Photographers often gauge a negative
by holding it up against a light box, even a brightly lit wall : the thinnest
picture which still shows detail in the transparent areas is just right for
enlarging. Anything thinner than this is termed underexposure and has to be
discarded ; anything darker is overexposure and is equally undesirable.

Careful measurements have shown that once the sun is clear of the horizon, daylight rapidly increases in strength and reaches a maximum in about 2 – 3 hours. After this it stays fairly constant, falling away as rapidly towards sunset as it did in the morning. Excluding the first and last two hours of the day, therefore, daylight may be taken as fairly constant throughout the day and the only other factor which can diminish its strength is the presence of clouds in the sky.
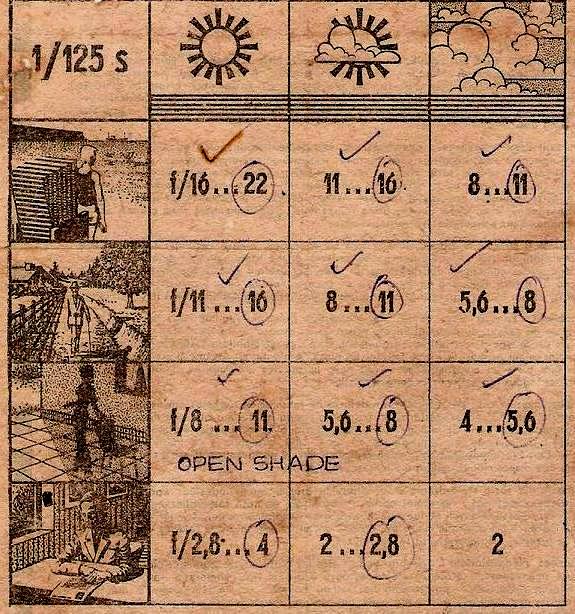 |
| This pretty exposure guide could be found packed in with Orwo 125 ASA black and white negative film in earlier days. |
Above we see an exposure table which appeared a long time back on the instruction sheet accompanying a roll of black and white negative film. Photographic exposure is mainly a matter of getting the right amount of light on the film and exposure tables like the one you see here are meant to assist you in this task. Both camera manuals as well as film instructions sheets earlier carried such tables listing various conditions of weather, sometimes illustrated pictorially, together with exposure recommendations that would lead to a satisfactorily exposed negative under each condition.
If your camera has a fixed lens opening there is not much to choose from and you can ignore these tables. Remembering that your box has been designed to give best results outdoors on a bright sunny day, load your camera with a medium speed film (ISO 100 or 125) and make sure you put the sun at your back when you point your camera at the subject. On many instruments however you find a choice of aperture stops and speeds. The graduations may show a series of f-numbers like 11, 16, 22, or a plain series of numbers: 1, 2, 3, 4 ; or even weather symbols. A camera of this kind is more versatile because it lets you make an allowance for the different kinds of lighting found out-of-doors.
For the purpose of the photographer there are four kinds of daylight which affect the exposure, each about one half as bright as the one before it:
1) Bright Sun, which leads to dark, contrasty shadows
2) Hazy Sun, where a thin, wispy layer of clouds gives rise to watery shadows.
3) Cloudy Bright, a condition with no shadows but still bright and cheerful.
4a) Cloudy Dull, where the sky is laden with dark clouds
4b) Open Shade, where the subject is shaded from the sun and receives light from a large area of the sky in front.
If you live in a country where you do not get much sunshine it can be an interesting pastime to step out into the open and try your hand at guessing the weather ; is it cloudy bright or hazy sun? Keep in mind that open shade is as bright as cloudy dull, and remember, too, that exposure tables work only during the day excluding the first and last two hours. The table below has taken care of all the calculations and if you have learned to guess the light correctly, you can depend on it to give correctly exposed negatives, provided, of course, your camera is working as it should.

Does the table above seem bewildering? It is quite simple really and takes into account every possible setting your camera is likely to have. For example let us suppose you are required to shoot a picture under Hazy Sun conditions. The table then tells you that if the shutter speed of the camera is 1/25 sec, you need to use a lens aperture of f/22. Run your eye along the hazy-sun line and you will also see that if your camera lens is graduated as 1-2-3, you need to use setting 2 for your picture.

Does the table above seem bewildering? It is quite simple really and takes into account every possible setting your camera is likely to have. For example let us suppose you are required to shoot a picture under Hazy Sun conditions. The table then tells you that if the shutter speed of the camera is 1/25 sec, you need to use a lens aperture of f/22. Run your eye along the hazy-sun line and you will also see that if your camera lens is graduated as 1-2-3, you need to use setting 2 for your picture.
The data in the table assume that you know what the f-stop values of your camera lens are. But, you say, my camera lens has a lever that carries no numbers; so what am I to do now? In the case of an unmarked lens, it is still possible by peering into the lens to find which aperture stop is larger and which small. Now take a strip of gummed paper and label it with the letters L—S, for large and small (or L—M—S, even 1—2—3, whichever you prefer). Stick the gummed strip next to the aperture lever and you have a camera f-stop adequately graduated!