The reader who is coming to the subject of photography for the first time may find himself bewildered by the terminology used by the camera dealer down the street : the stops, shutter speeds, film development and the like. If you are planning to buy a box camera and are feeling confused and hopelessly at sea, this article should help dispel most of your doubts.
The
simplest kind of camera is a pin-hole camera. As the cut-out illustration here
shows, this is a light tight box with a tiny pin prick made on one side and a
sheet of film held at the other side. If the box is now aimed at an object,
rays of light coming from the scene criss-cross each other as they pass through
the pin-hole giving rise to a faint upside down image on the film.
The pin-hole camera is often looked upon as a mere scientific novelty, but actual photographs may be taken with the device, the only impediment being that as the image produced is exceedingly dim in illumination, the film or plate has to be exposed for a lengthy period running into several minutes.
 |
| A pinhole camera forms an inverted picture of a scene, and forms the basis of the camera-obscura, the forerunner of the modern camera. |
The pin-hole camera is often looked upon as a mere scientific novelty, but actual photographs may be taken with the device, the only impediment being that as the image produced is exceedingly dim in illumination, the film or plate has to be exposed for a lengthy period running into several minutes.
A pin-hole
device can also be used as an object of amusement. For this purpose, the back
of the box which receives the film is replaced by a sheet of tracing paper or a
ground glass screen. If the box is now pointed at a brightly lit scene and the
user takes cover under a dark cloth or blanket, he will find a faint image
appears on the screen. If the picture is too faint to be viewed comfortably the
pin-hole may be enlarged. This gives a brighter result but increases the
fuzziness of the picture. For best results, a simple positive lens from the
optician’s shop held in a cylindrical cardboard tube may be substituted in
place of the pin-hole. With a bit of trial the lens can be focused when a
bright and clear picture will be seen on the screen. A device of this kind is
known as a camera obscura, and was used in the 17th and 18th centuries by artists to
trace perspective views of landscapes and architecture in paintings.
The camera
obscura with its bright, magical image was also used as a novelty in public
places in earlier times. People marvelled at the lifelike picture showing
branches swaying in the wind, people moving around, and architecture, but the
picture seen was only a fleeting impression leaving no permanent trace on the
wall or screen which received the impression.
The camera
obscura embodies within it the basic principle of the photographic camera, but
the arrival of photography had to wait till the mid-nineteenth century when
advances in applied chemistry made it possible to record the image permanently
on a chemically treated surface.
Photography
is thus the result of two distinct lines of scientific progress : optics, which
helps form an image of a scene on a flat surface, and chemistry, which produces
a permanent record of this image.
In 1851, a London sculptor named Scott Archer came up with a chemical process of photography known as the Wet Plate Process, which though far too cumbersome by present day standards, was nonetheless a great improvement on earlier processes in use (read more about this later). Archer's process remained in use until 1871, when Richard Leach Maddox came up with the idea of dry plates. A dry plate was a glass plate with a photographic light sensitive coating quite similar to the one we have on photo-film today, and the process, unlike Archer's method, made it possible to take camera exposures whilst the plates were dry. This innovation was to set an important milestone; it marked the beginning of modern photography, paving the way for further improvements in the line. It also led to the invention of flexible photographic film as we know it today. Once the
basic problems of the process were overcome inventors and designers turned their
attention to devising all kinds of innovative features aimed at making the camera a
versatile tool. In the early days of dry plates, a great number of detective spy cameras appeared, each tiny instrument promising a feature that made it remarkably easy to take pictures outdoors without drawing attention to itself. Among the camera models developed from the last decade of the nineteenth century onwards were the hand-held folding camera
using accordion style bellows designed so that the camera could be made to
collapse ; the twin-lens reflex and the single-lens reflex ; and the miniature,
a camera so unobtrusive it made possible for the first time true candid shots
of everyday scenes. Each of these designs was highly sophisticated and gave
splendid performance in the field for which it was intended, but the knobs and
dials on these instruments also meant that amateurs generally tended to look upon
photography as an impossibly difficult pastime requiring specialized knowledge.
The box camera, first introduced by George Eastman in 1888, overcame this
difficulty by presenting the amateur with an instrument simple enough to operate
and having the minimum of adjustments, thus bringing photography within the
scope of the average layman who had no knowledge of the subject.
With this background information in hand, we are in a position now to take a closer look at the inside of a box camera. No matter
how complicated it may seem, every film camera is made up of a light tight box
with a lens at one end whose purpose is to project a clear, well-defined image
of the scene being photographed onto a light sensitive film held flat at the
other end.
The figure
here shows a simplified view of the interior of a box-type camera. These
cameras typically used ‘roll film’, available earlier in a variety of sizes. As
you can see, the loaded spool is held at the bottom of the box and after each
picture is snapped a film wind knob or key is turned to bring fresh unexposed
film over the picture area in readiness for the next picture.
Many box cameras employ a simple meniscus (or spectacle type) lens to form the picture on the film. Working on its own, a simple lens of this kind gives a fuzzy image, and the manufacturer gets round this trouble by having a thin metal plate next to the lens with a tiny hole punched in it. This plate, known as a ‘stop’ blocks off all extraneous light rays coming from the subject letting only a narrow central beam to get across resulting in a picture that is sharp and well defined over its whole area.
 |
| The interior of a box camera. Note that the film carrier which holds the spools is omitted. |
Many box cameras employ a simple meniscus (or spectacle type) lens to form the picture on the film. Working on its own, a simple lens of this kind gives a fuzzy image, and the manufacturer gets round this trouble by having a thin metal plate next to the lens with a tiny hole punched in it. This plate, known as a ‘stop’ blocks off all extraneous light rays coming from the subject letting only a narrow central beam to get across resulting in a picture that is sharp and well defined over its whole area.
Working
close to the stop is another mechanical contrivance that is known as the
shutter. In a box camera the shutter may consist of a spring-driven plate which
in its normal state covers the lens opening in the stop thereby allowing no
light to reach the film. When you press the button to snap a picture, the
shutter blade smartly flips aside flashing the picture on the film briefly
(usually 1/25 second) before it moves back into place to cover the lens opening
again.
The
shutter therefore decides the duration of time light acts on the film when you
take the picture. The stop on the other hand governs the brightness of the
image momentarily flashed on the film—the tinier the lens opening, the fainter
the picture flashed. Between them, these two components govern the total quantity
of light reaching your film during picture taking.
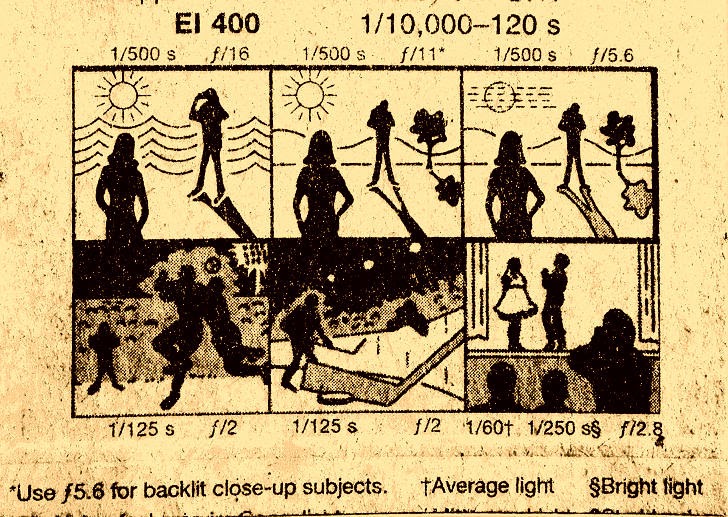 |
| Film instruction sheets carried exposure tables to guide the novice. This exposure chart was supplied with a film having a speed of 400 ASA. As such films are generally used for low-light work, the chart lists both indoor and outdoor subjects. |
But to return to our illustration, the lens shown here is set in the body of the camera with no adjustment for focussing. This may appear strange, but it is yet another way the designer simplifies the operation of his camera. A lens of this kind is known as a fixed focus lens ; it is set during manufacture to give sharp pictures of distant objects. As the stop opening used on these cameras is only the tiniest hole about a few millimeters wide, objects even as close as 7 or 8 feet away from the camera begin to pose as ‘distant’ for the lens. This means that everything about 8 feet away and beyond will appear with equal sharpness on the film, a feature welcomed by most amateurs as it frees them from the worry of focussing while snapping their pictures.
Having now
seen the interior of a box camera, let us now suppose we actually load our box
with a film and try our hand at taking a few pictures outdoors. Roll films, as
your photo dealer will show you, come in a variety of ‘speeds’. The speed of a film
is measure of its sensitivity to light. Thus a film with ISO 50 marked on
the box has low sensitivity and is said to be a slow speed film. A speed
of ISO 100 or thereabouts is considered a medium speed film and is recommended
for general photography. On the other hand if the film box is marked ISO 400 or
so, it means it is a high speed film requiring only a very short burst of light
to register the image.
 For most general photography, a medium speed film is all that is needed, so we load up our box with a roll of medium speed. Now as we go about snapping pictures, what actually happens within the camera is this : each time you click a picture, the lens projects on the
film an image of the scene in a short burst of light. Although no picture
appears at this stage, a chemical change has in fact occurred on the emulsion,
which is the light-sensitive coating on your film. An invisible picture known
as a latent image has been formed on the emulsion. Next, the film is removed
from the camera in total darkness and put through a solution known as the
developer which brings out the image. This is followed by another solution
known as a fixing bath which makes the picture a permanent record and keeps it
from fading away in time.
For most general photography, a medium speed film is all that is needed, so we load up our box with a roll of medium speed. Now as we go about snapping pictures, what actually happens within the camera is this : each time you click a picture, the lens projects on the
film an image of the scene in a short burst of light. Although no picture
appears at this stage, a chemical change has in fact occurred on the emulsion,
which is the light-sensitive coating on your film. An invisible picture known
as a latent image has been formed on the emulsion. Next, the film is removed
from the camera in total darkness and put through a solution known as the
developer which brings out the image. This is followed by another solution
known as a fixing bath which makes the picture a permanent record and keeps it
from fading away in time.
After the
film has been washed and dried it may be inspected by holding it up to the
light. The picture will be now clearly seen. It is a darkish record ; light
areas in the original scene appear dark, while dark areas are rendered white.
The image formed is thus reversed in tones and is known as a negative.
Having secured a record of the scene as a negative, the next step consists of laying the negative on a photographic paper and shining a light onto it. When the paper is processed in chemicals similar to those used in making the negative, a picture in life-like tones is produced.
Having secured a record of the scene as a negative, the next step consists of laying the negative on a photographic paper and shining a light onto it. When the paper is processed in chemicals similar to those used in making the negative, a picture in life-like tones is produced.
This is
only the beginning of our excursion of this fascinating subject. As you go
along, you will find more examples of work produced with a box camera. You will
also find interesting historical details as well as a full technical discussion
of the features of these cameras further on in this website.
Ravindra Bhalerao

Ravindra Bhalerao
